Adjustable Front Track Bar: ICON Vehicle Dynamics 21020
Install guide for Jeep Wrangler JK (2007+) · reviewed against the manufacturer’s instructions · 2026-08-16
If your lifted JK wanders in its lane or the front axle sits visibly off-center, the track bar is usually the part responsible. ICON's adjustable front track bar (part 21020) replaces the fixed stock bar with one you can dial in on the vehicle. This is a bolt-on job with hand tools. Here's the whole install, step by step, based on ICON's official instructions (REV.D).
Tools required
- Torque wrench
- 15mm socket / wrench
- 21mm socket / wrench
- 5/16" socket / wrench
- 3/8" socket wrench
In the box
- JK front adjustable track bar
- Left/right adjusting sleeve
- Rod end
- 2 heim spacers
- 2 × 3/8-16 × 1.00 12-pt pinch bolts
Before the first bolt
- Use extreme caution any time you work under a vehicle supported on jack stands.
- Never adjust past 2.00" measured from the center of the rod end to the edge of the pinch housing. ICON does not warranty a failure caused by excessive adjustment.
- If used with the stock track bar bracket, trimming is required (step 4).
Step 1: Remove the stock track bar
Pull the stock bar off the frame and the axle. Both ends take a 21mm. Don't be surprised if the Jeep shifts a little once it's out.
- 21mm at frame and axle
Step 2: Install the ICON bar
Hang the new bar using your factory hardware, again with the 21mm, and torque both ends to factory spec.
- Factory hardware
- Torque to factory spec
Step 3: Get the orientation right
The adjustable end goes toward the axle, and the bend in the bar points forward and up so it clears the differential.
- Adjustable end → axle
- Bend forward and up
Step 4: Clearance the factory bracket
Installing into the factory mount? The track bar bracket at the axle needs clearancing for the pinch block. Trim it as shown, just enough to clear.
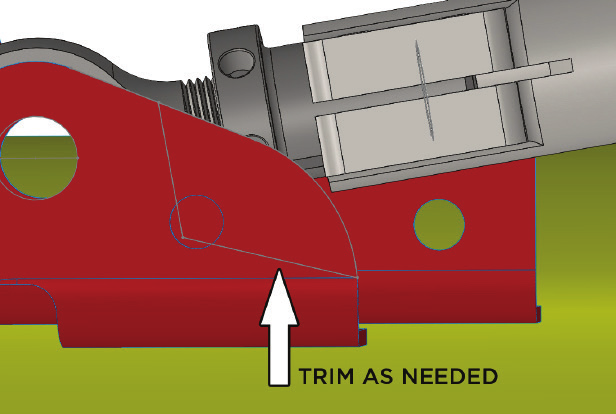
Step 5: Paint exposed metal
Hit anywhere you trimmed with paint so it doesn't rust.
Step 6: Center the axle
Loosen the pinch bolts with the 3/8" 12-pt and turn the collar until the axle sits centered under the Jeep. Line up the slit in the collar with the slit in the tube, apply blue thread locker to the pinch bolts, and tighten them in an opposing pattern. Do not overtighten.
- 3/8" 12-pt on the pinch bolts
- Blue thread locker
- Torque pinch bolts to 25 ft-lbs
Step 7: Center the steering wheel
Loosen the adjusting collar in the drag link with the 15mm, straighten the wheel, and torque back to factory spec. Skipping this triggers stability-control faults. Center the wheel before you drive.
- 15mm on the drag link collar
- Torque to factory spec
Before you drive
- Verify all fasteners are properly torqued before driving.
- Retorque all nuts, bolts and lugs after 100 miles, and periodically thereafter.
The part, and the official instructions
This guide is Trail Fortress’s summary of the manufacturer’s installation instructions. Always follow the official document: ICON installation instructions, REV.D (PDF).
View the ICON Vehicle Dynamics 21020 Adjustable Front Track Bar at Trail Fortress →